CI with Linear, GitHub, and Xcode Cloud
Are you trying to figure out how to get your issue tracker, GitHub, and Xcode Cloud to all play together nicely? I've settled on a good flow for small teams or individuals like myself. This is one of those topics that largely depends on your specific needs, but I can provide a good starting point, which you can modify later if needed.
I won't lie; this post has a lot of stuff. I've revised it several times, but I'll go ahead and apologize in advance for some of the jumping around. It is not a linear (no pun intended) topic. But I promise you that this is one of those things that seems wildly cumbersome to set up but hums along once it is.
My requirements
I am explicitly choosing Linear, GitHub, and Xcode Cloud to fulfill their respective duties, but you could swap out your tool of choice and achieve similar continuity. That being said, everything moving forward will be in the context of the aforementioned software.
- Linear for project management - if you haven't used Linear, you should give it a shot. It's beautiful software for issue tracking and project planning. As an indie dev, I find it more useful than GitHub's issues because I have to do a hell of a lot more than close issues and merge PRs from a single repo. Linear is blazing fast to use and keeps me organized.
- GitHub for version control - used to store code, and handle pull requests. By the end of this post, you'll see that Xcode Cloud and Linear will be nicely integrated into issues and PRs.
- Xcode Cloud for CI - Apple gives 25 free hours of compute time a month, which makes their continuous integration appealing to small teams that don't need to create a million builds. It's also integrated into Xcode, making it extremely convenient.
- Easy for me now, but ready for growth - I could save a lot of time (including writing this post) by ignoring much of this and thinking only as an individual. I could run my tests locally. I could merge branches willy-nilly and skip doing PRs. However, I want to future-proof my workflow by considering what onboarding additional people to the project might look like. Here we go...
Hooking things together
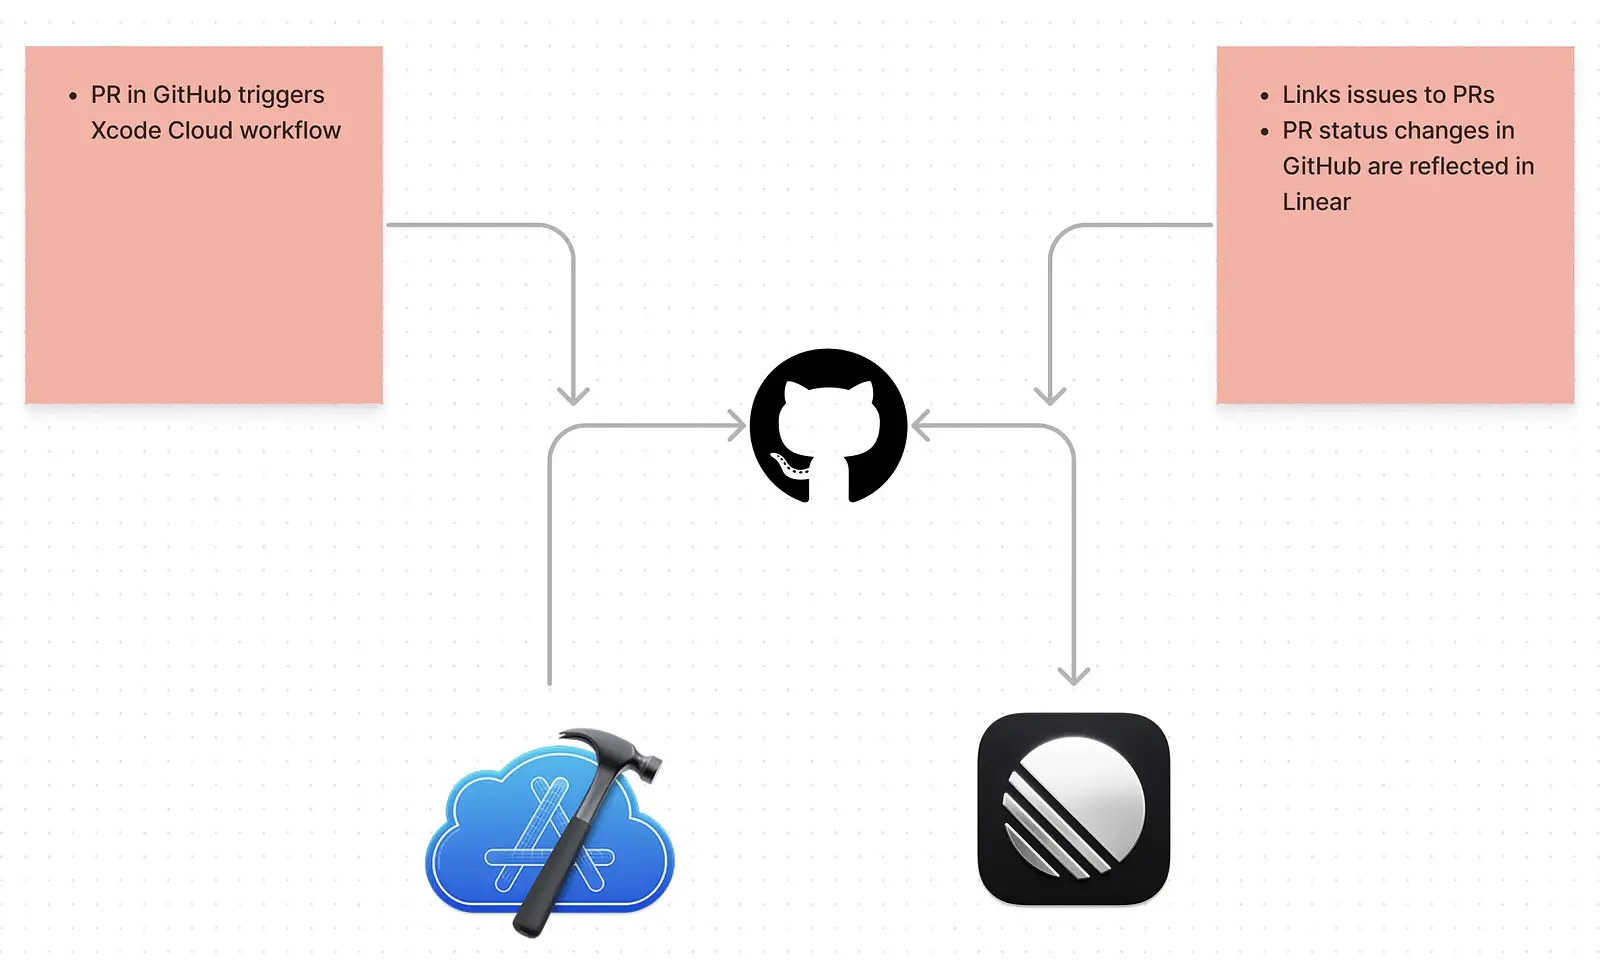
We must do a little housecleaning before I get to the big picture. We want these three tools to talk to each other, which they do nicely. Hooking them together means approving GitHub integrations for Linear and Xcode Cloud.
Linear & GitHub
In Linear, go to Settings > Integrations and find the GitHub option. Go through the process of allowing Linear access to GitHub. Once this is done, make sure you're viewing the settings for the GitHub integration and go to the Branch format section.
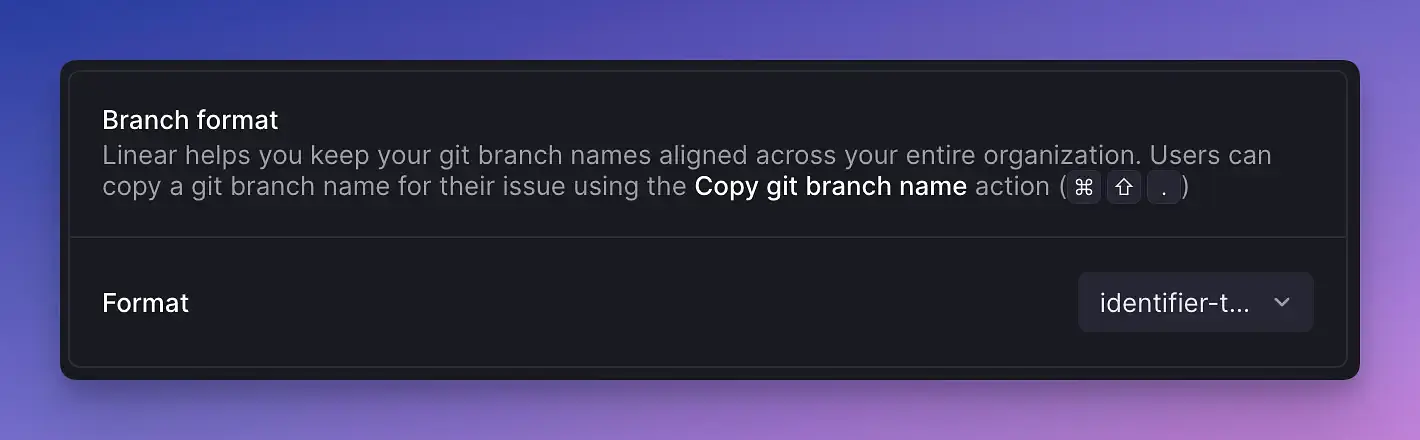
Choose identifier-title for the format. There are a limited number of options, but this will give us the suffix for our issue-related branches. Creating branch names prefixed by username doesn't make sense because work isn't isolated to an individual. I also don't think using the "release" prefix works either because sometimes our starting branches are for fixes, which makes "release" confusing. Using identifier-title will be the most versatile option, so go with that.
The branch name format will depend on your team name. In my case, I have an "Engineering" team in Linear, so my issues provide branch names like eng-75-fix-link-bug. Using this provided naming convention name is essential when beginning work on a new feature/hotfix branch. It helps create the connection between Linear and GitHub. After all, the genesis of this post is getting three pieces of software to integrate.
Xcode Cloud & GitHub
Open your project in Xcode and go to the Report Navigator (⌘9). Then click Cloud. To get started, you should see something similar to the prompt below. You must be enrolled in the Apple Developer Program for this to work.

Xcode is going to provide you with a default workflow, so you can go ahead and click Next. You can always edit it and add additional workflows later. Don't worry about creating all your workflows now. I just want you to see where it's done.
All good? Hopefully, everything went smoothly, and you've connected the three pieces of software. Now that the housecleaning is out of the way, we can move on to the good stuff!
The big picture
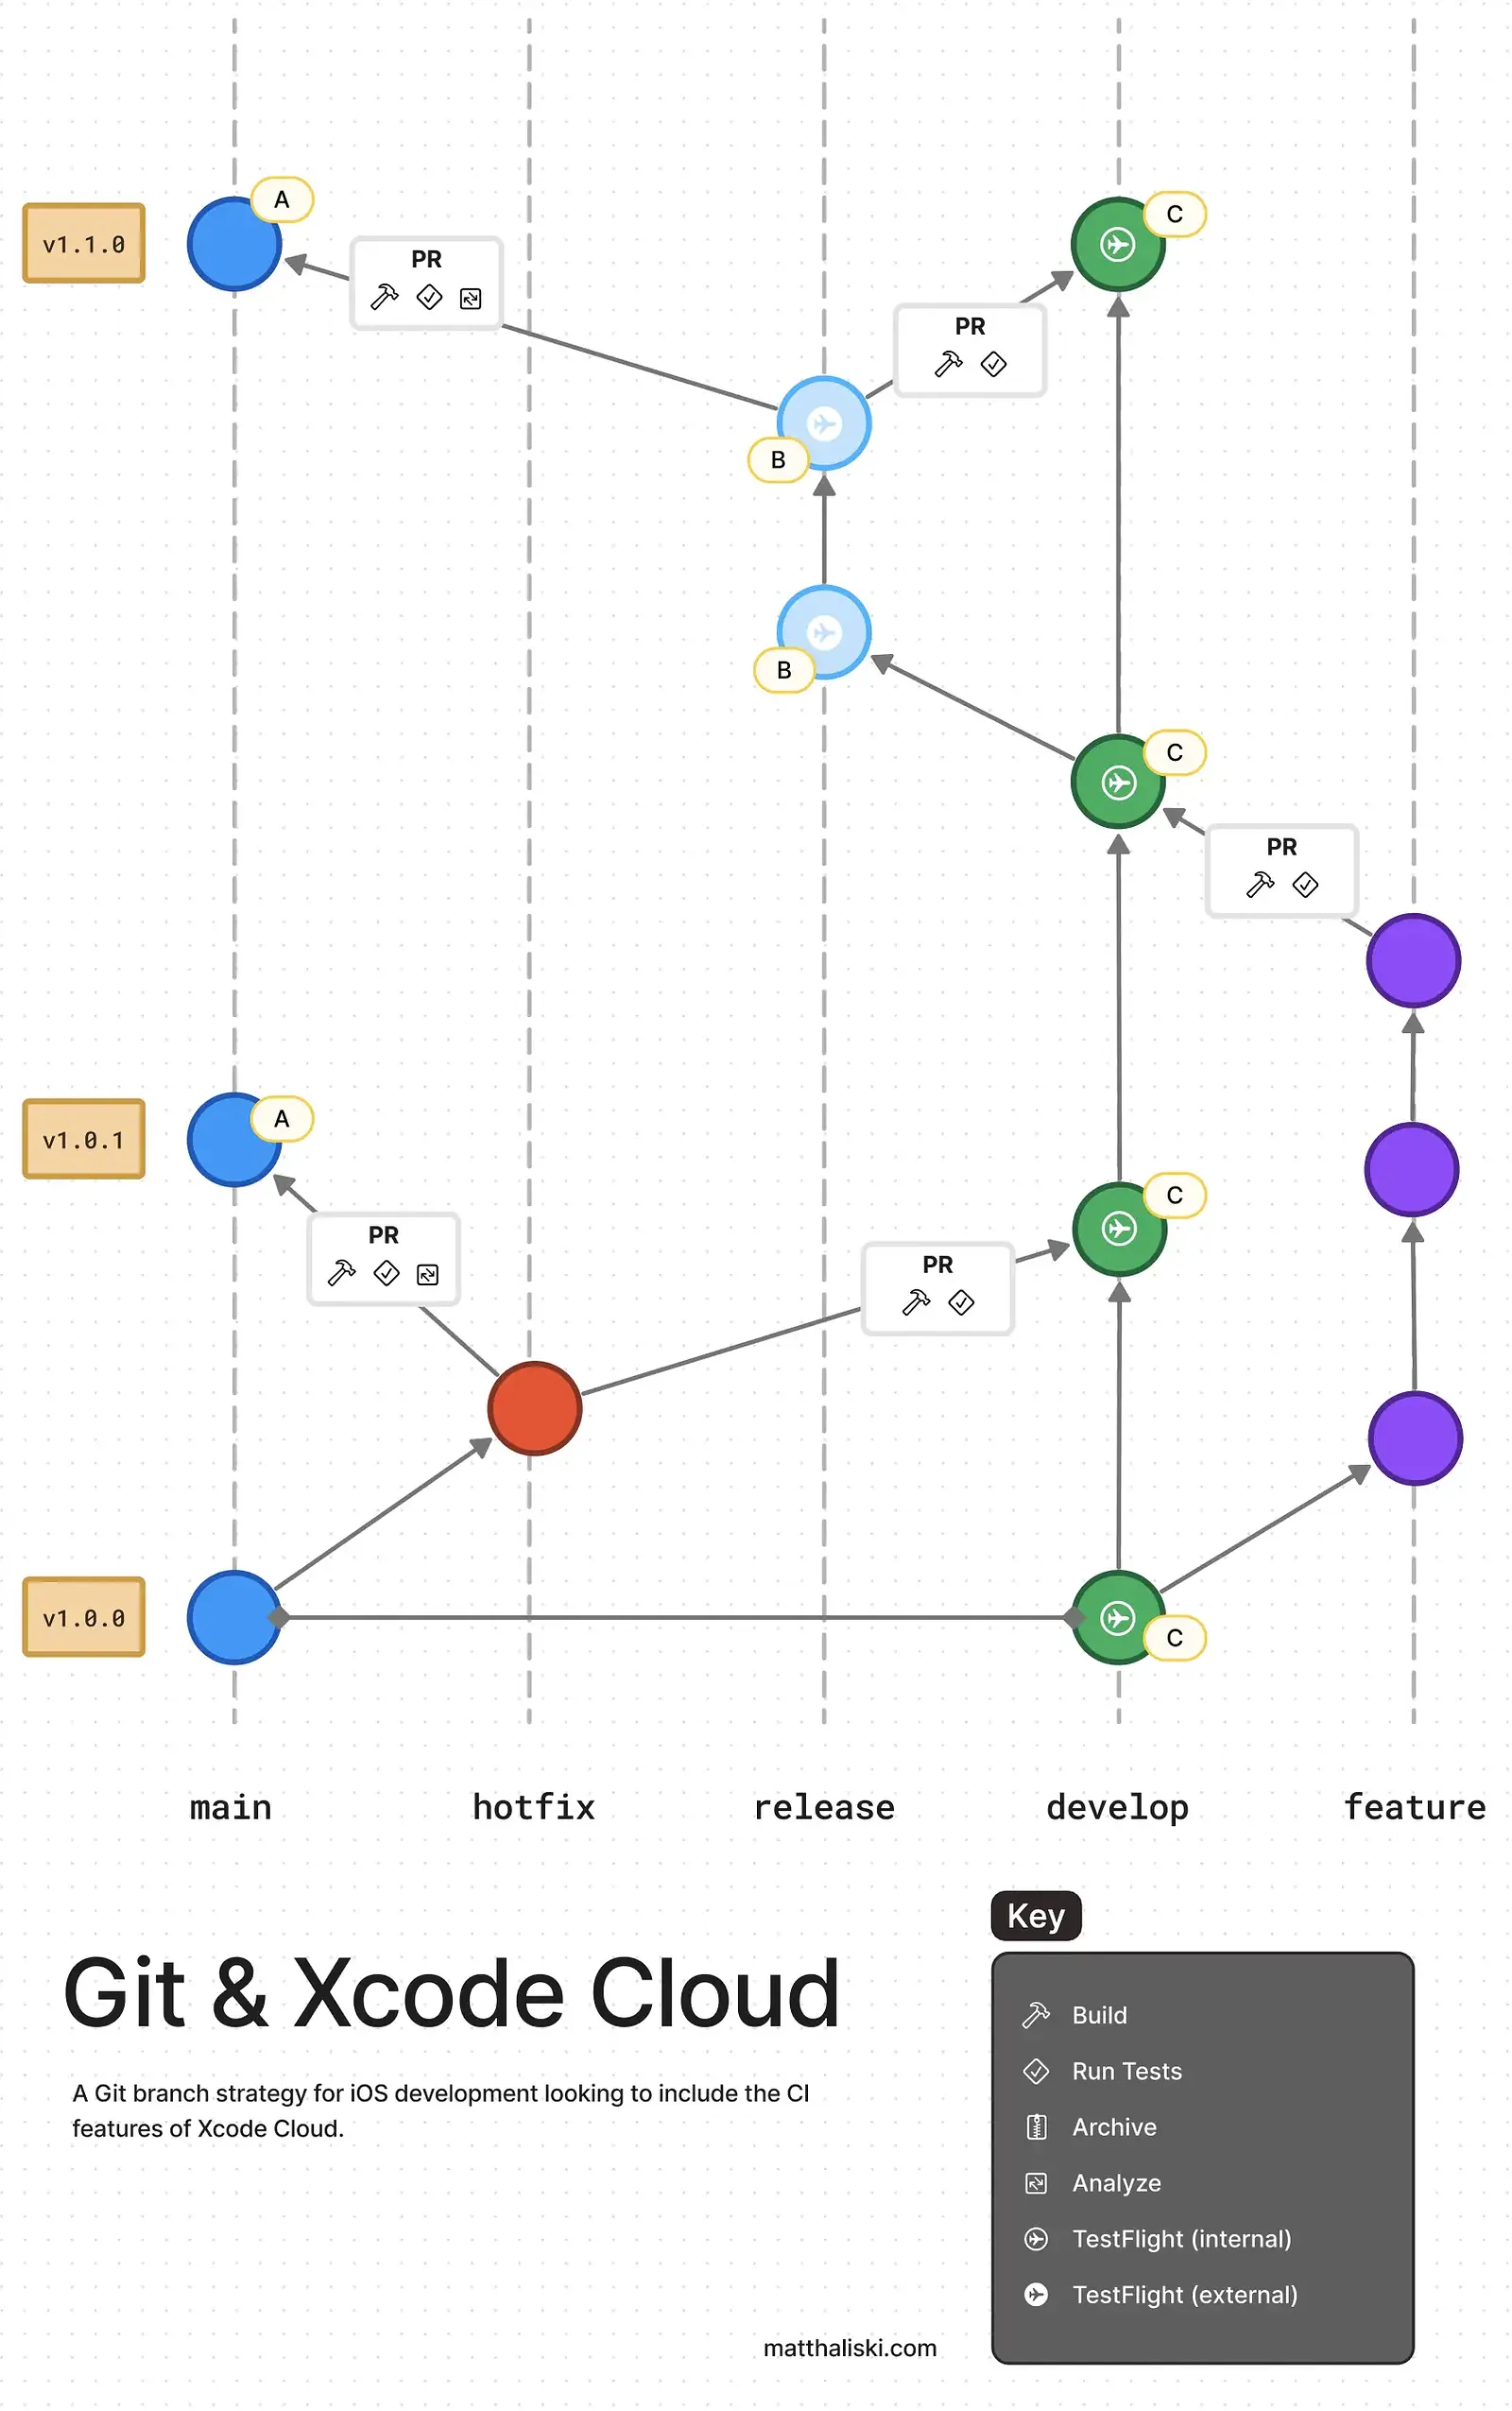
If you're familiar with Git Flow, this illustration won't be entirely foreign to you. I know some strong opinions are floating around out there, but Git Flow turns out to integrate nicely with Xcode Cloud. I'll use the different branch types as a path to walk through everything.
Branch Strategy Overview
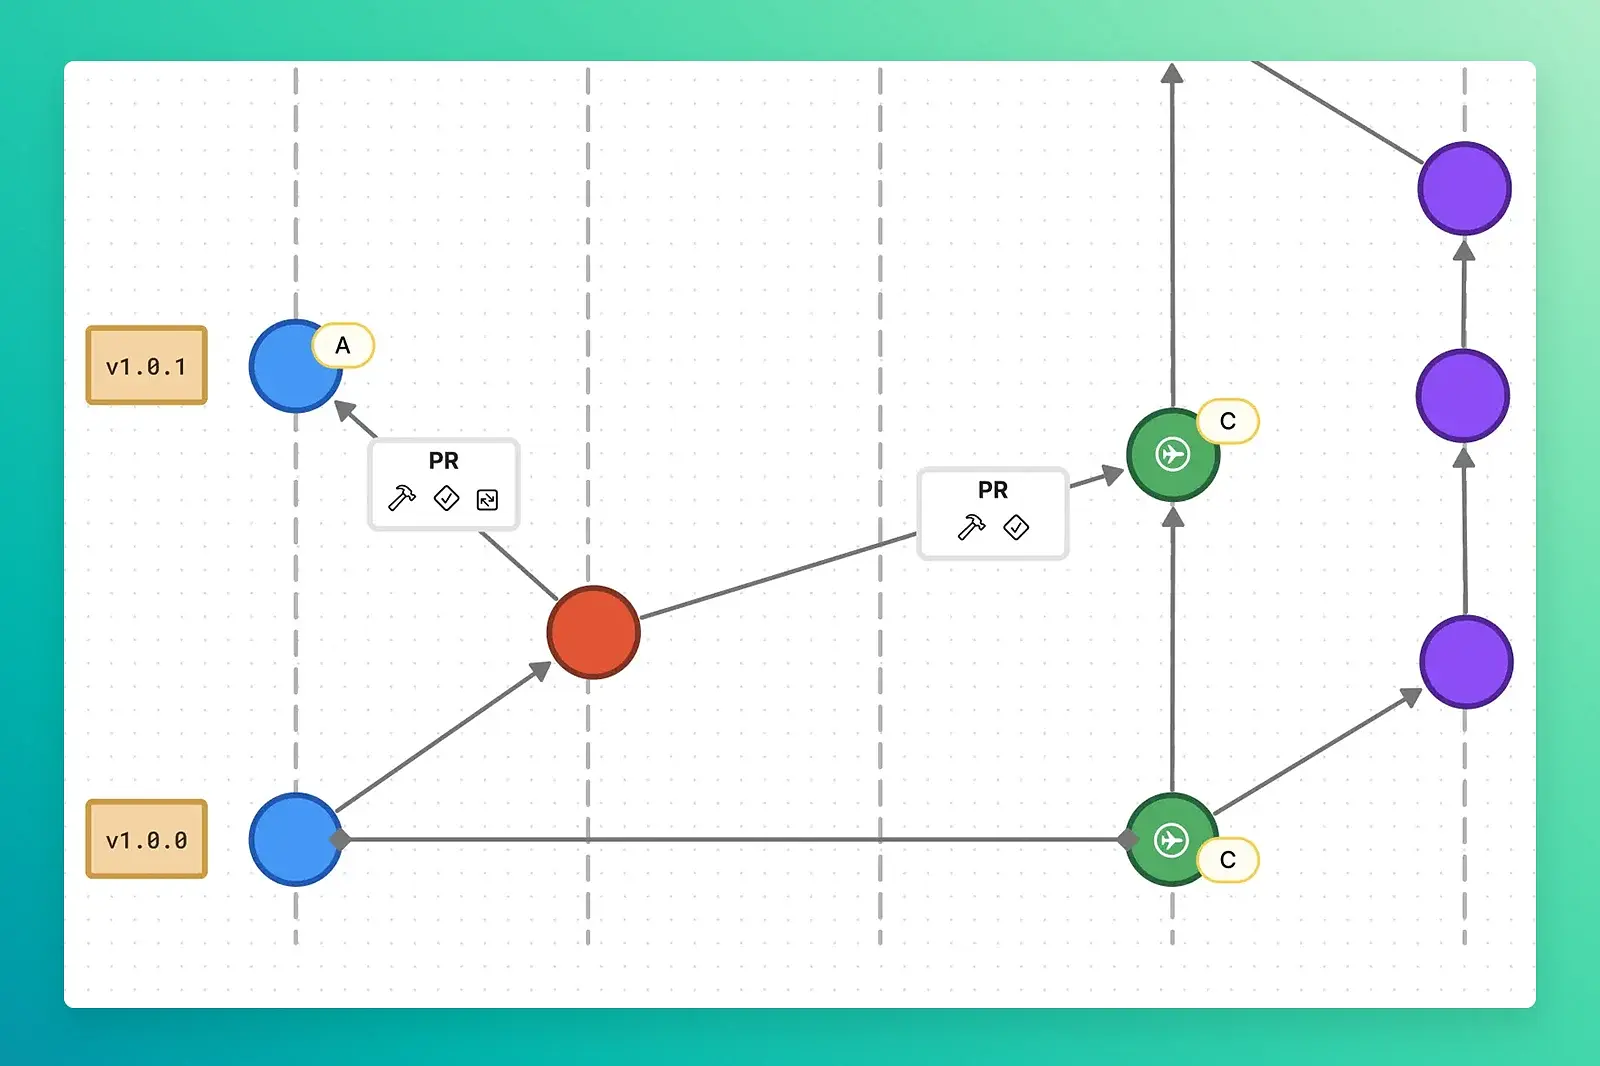
mainbranch- This is your production branch. Only release and hotfix branches should be merged via PR.
- You should tag a release in Git before submitting it to the App Store.
- (A) - Xcode Cloud actions: build, test, analyze, and archive
developbranch- This serves as the integration branch for features.
- Feature or hotfix branches should be merged via PR.
- Linear: your work on this branch targets the next milestone in Linear. You might be working towards a
1.5.0release, and after you've completed all those issues and merged them here, you will cut a release branch. Once1.5.0is cut, you focus on the next milestone (1.5.1or1.6.0). - (C) - Xcode Cloud actions: build, test, analyze, archive, TestFlight (internal)
- Feature branches (feature/*)
- These branches are created from
develop. - Linear: feature branches are created from issues. Those issues should be assigned to a milestone inside Linear.
- Use the
feature/eng-34-great-work-being-donenaming convention for the branch. This should be as simple as prefixing "feature/" to the branch name copied out of Linear if you followed the setup earlier. - Once complete, these are reviewed through a pull request and merged into
develop. - Build and test locally. Don't burn your Xcode Cloud compute time.
- These branches are created from
- Release branches (release/*)
- Create this branch from
developonce you've completed all work towards a Linear milestone. - Only commit adjustments to the existing work (no new features).
- Use the
release/1.5.0naming convention.1.5.0should also be the name of your milestone in Linear. - When complete, merge the release into
mainanddevelopvia pull request. It may seem redundant to create two PRs, but you should only have to write one and copy it to the other. Skipping this step would mean skipping CI checks. - (B) - Xcode Cloud actions: build, test, analyze, archive, TestFlight (external)
- Create this branch from
- Hotfix branches (hotfix/*)
- Branch off of
mainif a critical bug is found in production. - Use the
hotfix/1.5.1naming convention. I.e., you bump the "patch" number in SemVer. - After completion, merge this back into
mainanddevelopvia PR. - Linear: these would start as issues in Linear.
- Branch off of
That was a lot, I know! Hopefully, your existing experience with Git will lessen the burden a little bit. Now that we have an idea of how things are connected let's move on to Xcode Cloud.
Continuous integration with Xcode Cloud
Xcode Cloud aims to help you automate tasks to ensure app stability and save you time. It's the CI solution provided to you by Apple. You construct workflows that watch for an event (Start Condition) and perform some actions and optional post-actions.
If you press ⌘+9, and click Cloud in the Reports Navigator, you'll see where you can create and edit workflows. Here's what a workflow looks like:

You should be concerned with triggering workflows in three primary places:
- When creating a pull request.
- When the
developor a release branch changes (B, C). - When the
mainbranch changes (A).
Refer to Figure 4 for the "what and when" of it all. Broadly speaking, the actions run on pull requests are interested in ensuring that what you're committing doesn't break something once it's merged. The actions run after a merge are more concerned with getting things out to TestFlight and, eventually, the App Store.
Handling issues with Linear
You've come up with an excellent idea for a feature in your app. The first thing you should do is write it down. In this case, you should create an issue in Linear. If you took care of things in the Hooking things together section, Linear will provide you with the suffix for branches that creates the two-way connection to GitHub. You can copy the branch name by clicking on an issue and finding the icon in Figure 6 below and pressing it. You'll prefix what you copied with either feature/ or hotfix/ depending on the type of issue being worked on.

Discussions belong to Linear
At some point, you'll have to make the contentious decision about where to chronicle your issue discussions, and in this case, it's going to be Linear. GitHub is the 800-pound gorilla, and most people who write code are going to be familiar with their issue, discussion, and PR workflow. So, this decision might make some folks groan. It might make you groan! But if you haven't had the opportunity to kick the tires on Linear, I highly suggest you do so.
Linear allows all stakeholders (or just you) to view everything in a single spot. After all, small teams have to consider more than just what their code is doing. Things like marketing, design, and legal implications are equally important issues that don't live that close to your code, so Linear is a good choice here. You can organize these by setting up Teams to handle their respective issues in Linear. I haven't found GitHub to be particularly good at managing non-engineering-type tasks.
All is not lost for die-hard GitHub users. Creating branches with the Linear-provided name creates two-way links between the issue and the PR on GitHub. Here's an example of what gets automatically created in a GitHub PR. You can toggle the arrow to see the entire issue description as well.
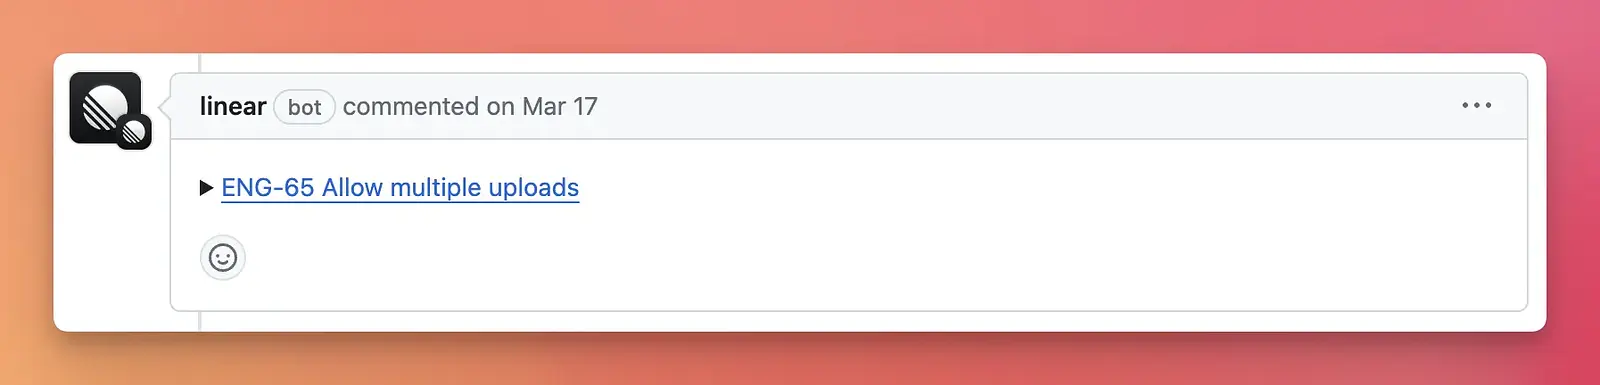
This allows you to browse from either the GitHub or Linear side of things while always maintaining a connection back to the other.
Let's quickly review. When you come up with an excellent idea for a feature, you do the following:
- Create an issue in Linear.
- Use the Linear-provided branch suffix to create a new branch prefixed by
feature/orhotfix/. - Discuss needs inside the Linear issue.
Create a pull request
When you believe you've completed your work, you'll want to create a PR for it on GitHub. This is where Xcode Cloud enters the picture. Two things are going to happen: (1) Linear will leave a comment that looks like Figure 7 above, and (2) Xcode Cloud will trigger a workflow.
Once that PR is hashed out and approved, it will be merged into an already-created release branch. This triggers a Release workflow that helps get things ready for our external TestFlight users.
But where did the release branch come from? How/where do we create it?
Release branches
Release branches originate as milestones inside of Linear. Milestones are created at the project level. An example hierarchy would look like:
- Team: Engineering
- Project: iOS App
- Alpha
- Issue 1
- Issue 2
- Beta
- Issue 3
- 1.0.0
- Issue 4
Alpha, beta, and 1.0.0 are all example milestones. You cut the release branch when all the issues assigned to a milestone are complete. At that point, things are feature-locked, and you're only polishing them up.
Release branches are meant for your external TestFlight testers to view. After you set it up, Xcode preps the archive for you whenever a release branch is changed.
Are we done yet?
Honestly, yeah! I think we are. This is a ton of stuff and doesn't lend itself to a step-by-step tutorial. I tried to get as much of it into this post as I could, and I hope it puts the big pieces into place. If I were you, and you haven't already, I would set up a test repository and iOS project in Xcode and play with all this. You'll see that it gets a lot easier once you're not worried about the technical setup of it all.
Phew... That was exhausting to write.