Preface
I assume you are here because you've had a rough time setting up VS Code to work with your Ruby (on Rails) projects. That's okay; I'm here to tell you there's light at the end of the tunnel. However, if you want a "batteries included" solution that avoids the setup I'm about to walk through, I can wholeheartedly recommend RubyMine. It's fantastic software. I've used it for years and love it, and it's certainly worth a few bucks a month. That said, if VS Code is your weapon of choice, let's get going.
Must-haves
You will have specific needs when writing Ruby on Rails code, but there are some essentials I believe everyone should have:
- Go to definition -
cmd+clicka method and jump to it. - Good Ruby syntax highlighting.
- Integration with the Standard Ruby gem with visual linting in the editor.
- Support for JavaScript Standard Style with visual linting in the editor.
- CSS autocompletion - I want CSS classes to autocomplete when writing HTML.
- Debugging support in VS Code's built-in debugging tool. i.e., you can drop breakpoints in the gutter and type stuff into a REPL.
- The big kicker is that all the above needs to work in a Docker container running the Rails app when it is in development.
In my experience, this list has been complex to achieve reliably outside of RubyMine. It seemed especially difficult if your Rails app was Dockerized. However, due largely to the work on the Ruby LSP extension being developed by the Spotify folks and VS Code's dev containers, we can have a pretty darn good setup in VS Code these days.
Let's set this all up, but first, we need to talk about dev containers. You can skip to the setup and installation section if dev containers are old hat to you.
Dev containers
If you're not on the dev container train, don't worry; I will explain them. To understand dev containers, we must first understand Docker and Docker Compose. These topics are much too large for this blog post, but I'll do my best to explain with some illustrations.
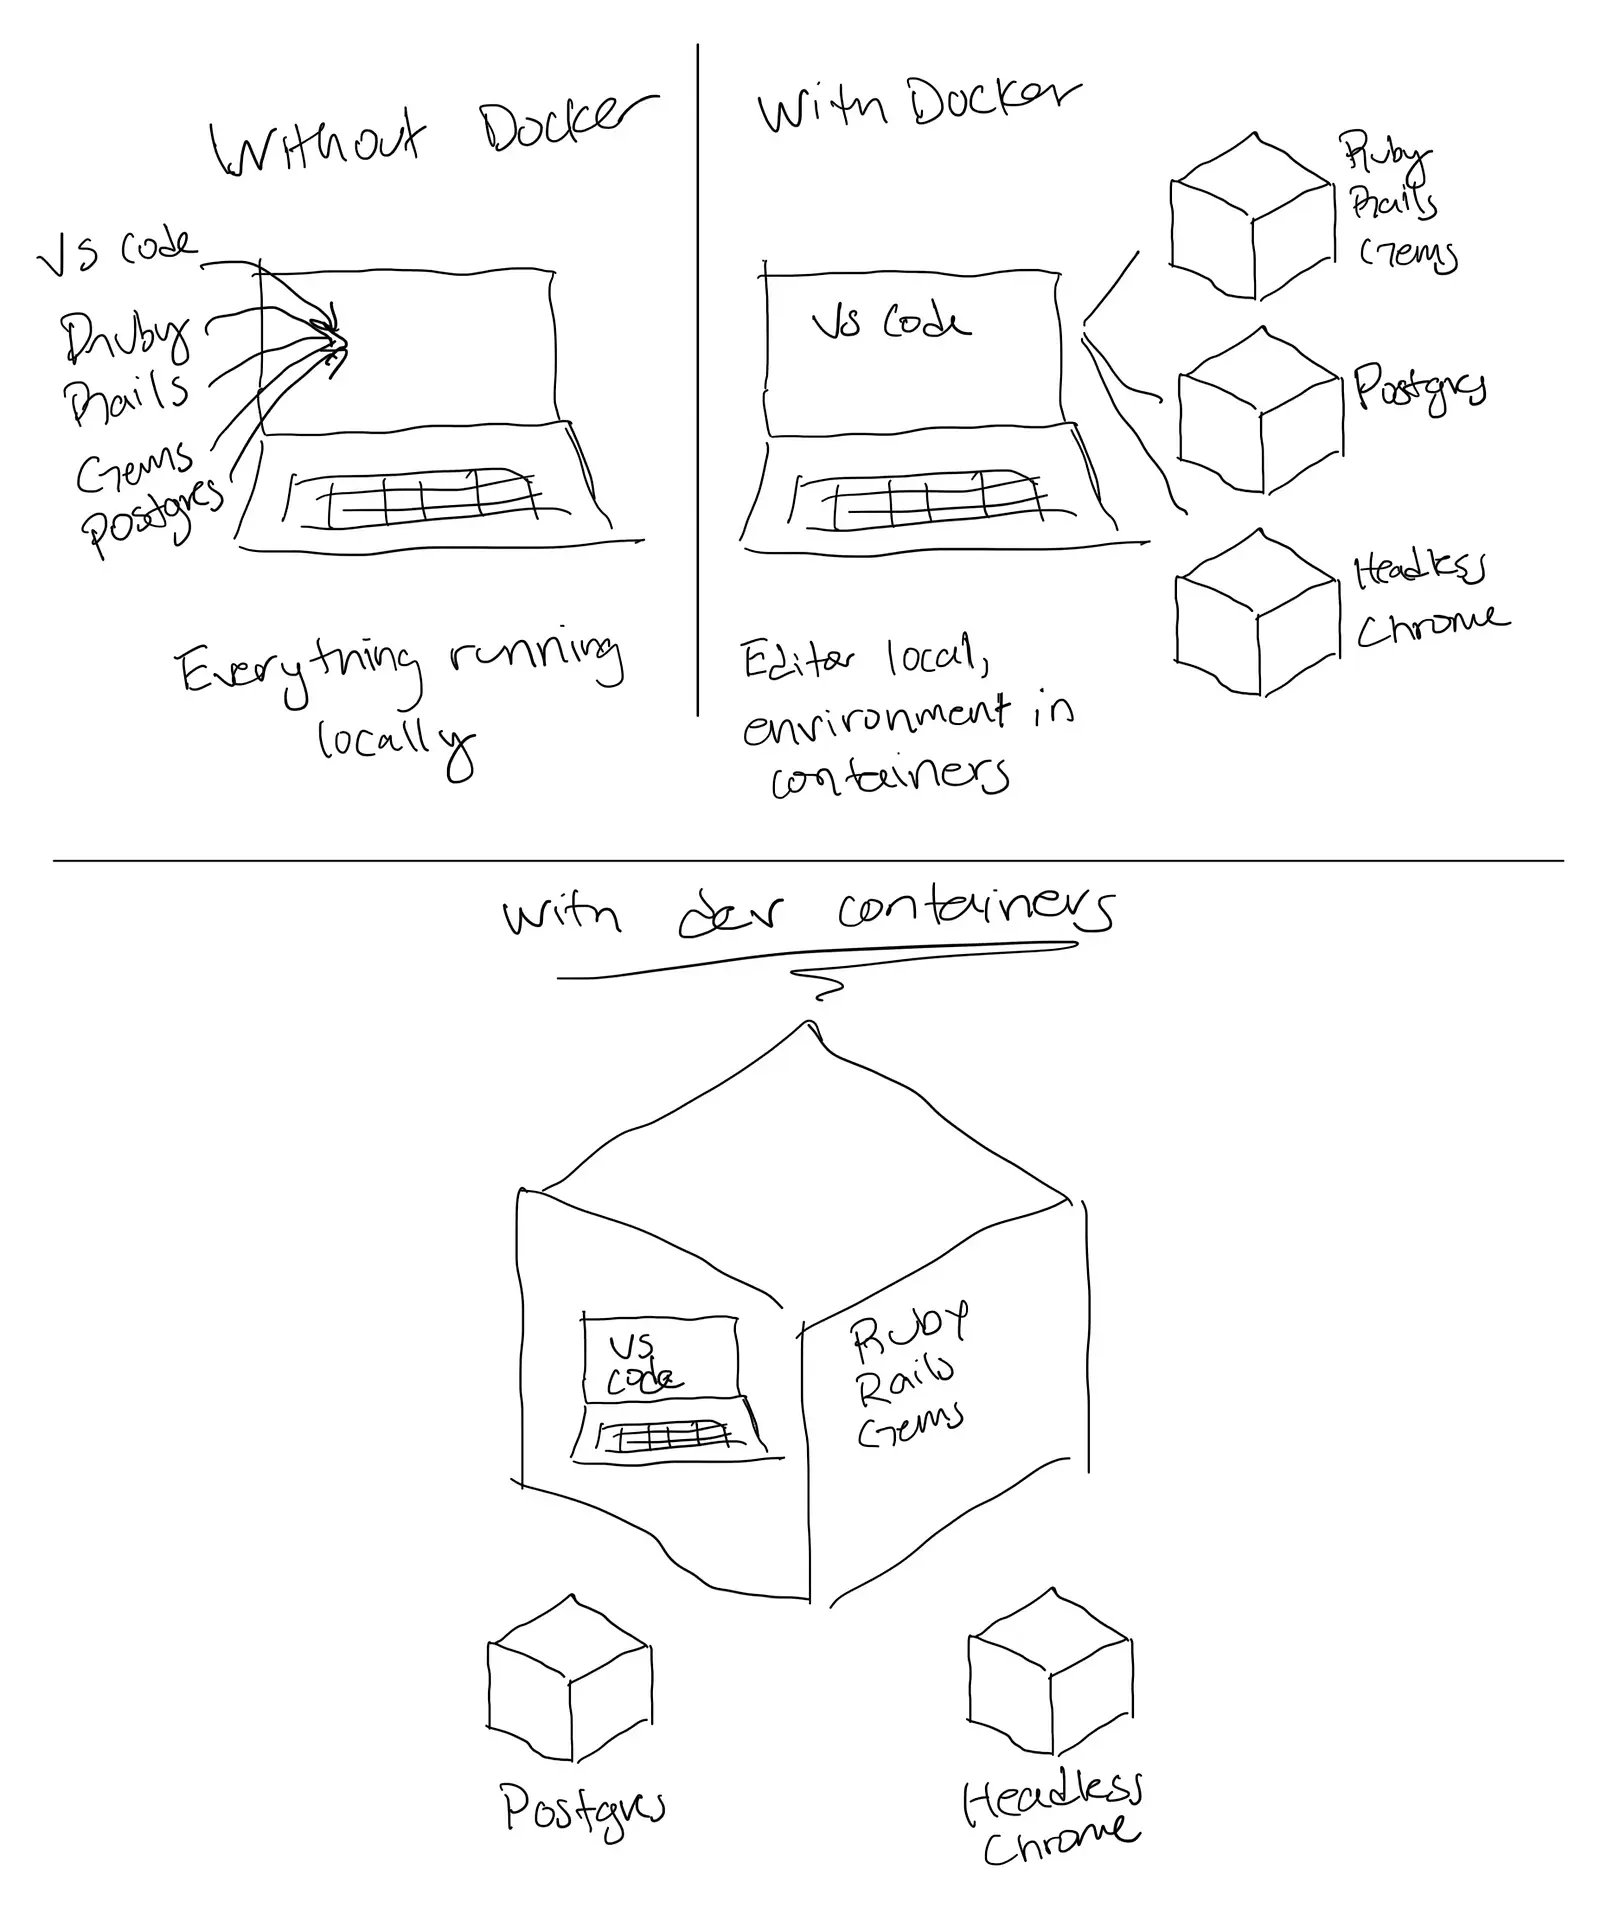
The three scenarios I have expertly 😂 illustrated above show how we've been developing Rails apps over time.
First, we did everything locally. As the developer, you were responsible for getting everything to run on your machine. That meant Ruby, a Ruby version manager, a database, bundler, an automated browser to help with testing, etc. It was a rite of passage for Rails folks and not exactly fun or easy. It could also lead to "well, it works on my machine" problems.
Next, Docker came along and gave us this idea of standardized environments (images) that can run independently of our machines. You don't even need Ruby installed on your laptop! Wow. We eventually managed our development environment with Docker Compose, which was an excellent quality-of-life improvement.
However, this setup often presented a problem. The barrier between your code editor and those Docker containers was hard to penetrate. VS Code, for example, wants to know all this information about your project, but man, it's over there in a container and hard to talk to. We needed a way to remove that barrier. Enter dev containers.
Dev containers can package up everything you need to run your Rails projects and include VS Code along with it. Yup! You get all the raw ingredients, knives, cutting boards, and pots & pans you need to create something delicious—no more barriers. You are working inside an easily reproducible container—no more tunneling into the appropriate container to execute something on the command line. Just type away as if everything were running locally (because it is!).
If you haven't experienced a project using dev containers, imagine sitting in your chair, opening up your project in VS Code, having the Docker containers start for you, and dropping a little bin/dev on the command line, and you're off to the races. It's that good. It's that fast.
Dev containers are an essential piece to the puzzle for creating an effective setup for Ruby on Rails in VS Code. Before their existence, I relied on RubyMine to "talk" to the various containers and keep me sane. I'm not saying you can't have a good setup without using them, but they're pretty awesome and could make your life easier.
Hopefully, that was helpful. Let's get going!
1 Setup and installation
FYI - I'm on a Mac, but these ideas and concepts should be mostly transferable to other platforms. You will likely have some of this stuff installed already, but I'm starting at the beginning in the interest of being thorough.
1.1 Install Docker Desktop
Go ahead and download Docker Desktop and install it on your system. This will give you a GUI to work with Docker, although you won't mess around with it too much. Most of the Docker stuff will be handled by the dev containers.
1.2 Install VS Code
I assume you already have this on your machine, but you can download and install it from here.
1.3 Install the Dev Containers extension
If you've never played around with dev containers, you must grab the extension and make sure it's installed to VS Code.
2 Create a new Rails app
Oops. We have a "chicken or the egg" problem here. While it is true that you don't need Ruby or Rails on your machine to run a project using dev containers, somebody needs to create the Rails app in the first place. Only one person will have to perform this step because once the dev containers are set up, everything will be handled by VS Code. For this next step, you need Ruby and the Rails gem installed on your machine.
2.1 Run rails new
rails new myapp -d postgresql --devcontainer --css bootstrap --javascript esbuild
Dev containers were introduced in Rails 7.2, so you'll need to be at that version or later for this to work smoothly.
2.2 Open in VS Code
Now let's open the app in VS Code
code myapp
After you've opened your app in VS Code, you're going to see a dialogue box pop up:
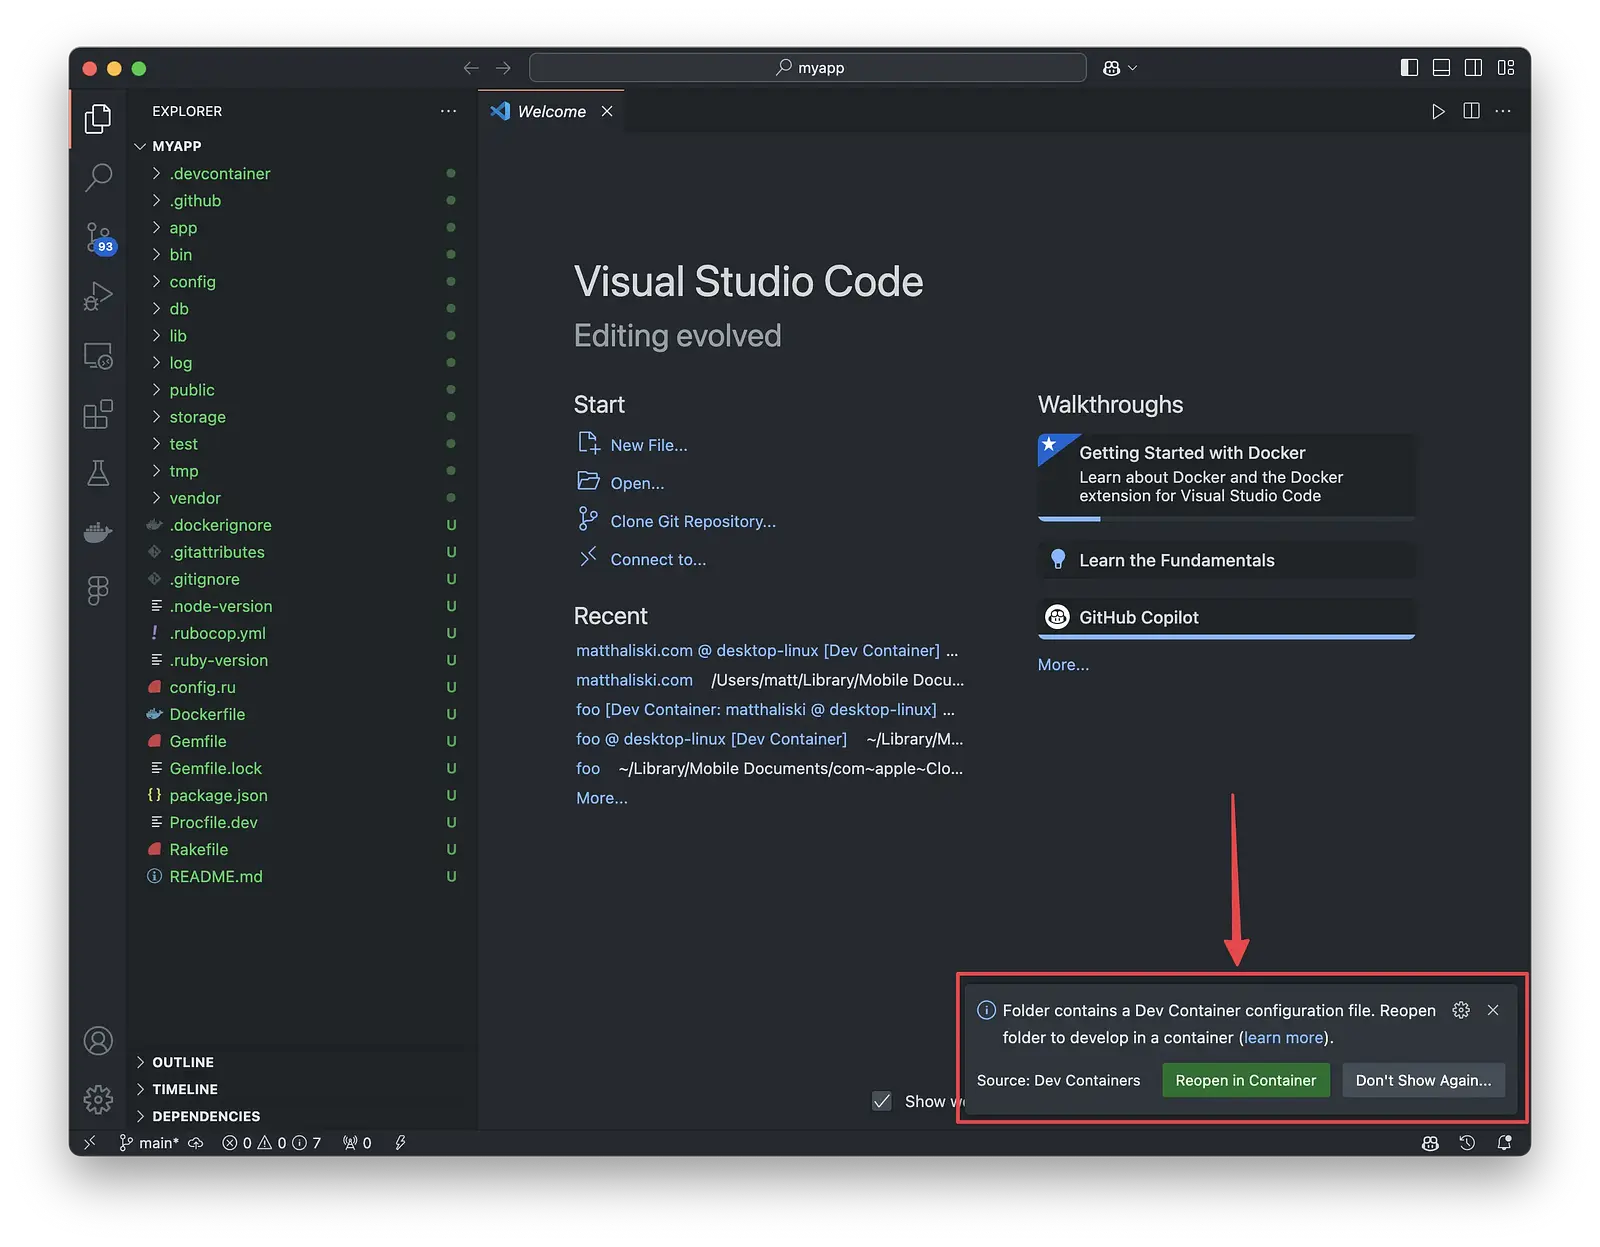
Go ahead and click Reopen in Container. If you miss the box, you can always cmd+shift+p and choose Dev Containers: Reopen in Container. When you do this, VS Code will download the appropriate Docker images and start the associated containers. You can verify whether things went smoothly or not by going over to Docker Desktop and seeing if you have something resembling this:

How easy was that?! And guess what? When you close your project in VS Code, those containers will shut themselves down for you. When you open it back up, the containers start again. If you weren't paying attention, you might not even realize you were using Docker. But that's kind of the point. It is an improvement on Docker Compose. Containers are great, but orchestrating them isn't very fun. This is much, much better.
2.3 The Terminal
Please take a quick peek at the Terminal inside of VS Code because you need to be aware of something else that has happened.

VS Code has already conveniently put you inside the container as the vscode user. You can run bundle exec rails commands without tunneling into the Docker container. You need to understand that you are not on your local filesystem as you might expect. Again, pretty awesome.
2.4 Add JavaScript packages
Let's take that terminal for a test drive. We need to use Yarn to add all the necessary packages to our project. Go ahead and issue these two commands:
yarn add @hotwired/stimulus @hotwired/turbo-rails @popperjs/core autoprefixer bootstrap bootstrap-icons esbuild postcss postcss-cli sass
and
yarn add nodemon --dev
Adding these packages should allow you to do the initial setup of the project, so run:
bin/setup
If that completes successfully, you should be able to run bin/dev and have your new app running at http://localhost:5200. Great work! We now have a new Rails app running inside a dev container, and we're using a VS Code instance that's living inside that same container. Woot!
3 Configuring the Ruby LSP extension
It's time to improve our Ruby on Rails experience when using VS Code. This requires us to install a few extensions and some JavaScript packages. I believe in installing as few extensions as possible, but we need a few to make things run how we want.
3.1 Add the Ruby LSP extension
The workhorse of our setup is the Ruby LSP extension. This extension is going to check off many of our requirements like:
- Syntax highlighting.
- Go to definition.
- Adopting the Standard Ruby gem (eventually)
- Debugging using VS Code's built-in tools.
Please get that installed. Once you've done that, we need to take an additional step to ensure the extension is installed for any future contributors to this project.
You've installed the Ruby LSP extension, but it's only on your local machine. Crucial extensions (and this is one) must be installed within the dev container for all team members to use or to be there when you rebuild the container.
You might be tempted to click the giant green button that says "Install in Dev Container," but don't. This would work, but only for you. Instead, we want to click the sprocket and choose Add to devcontainer.json.
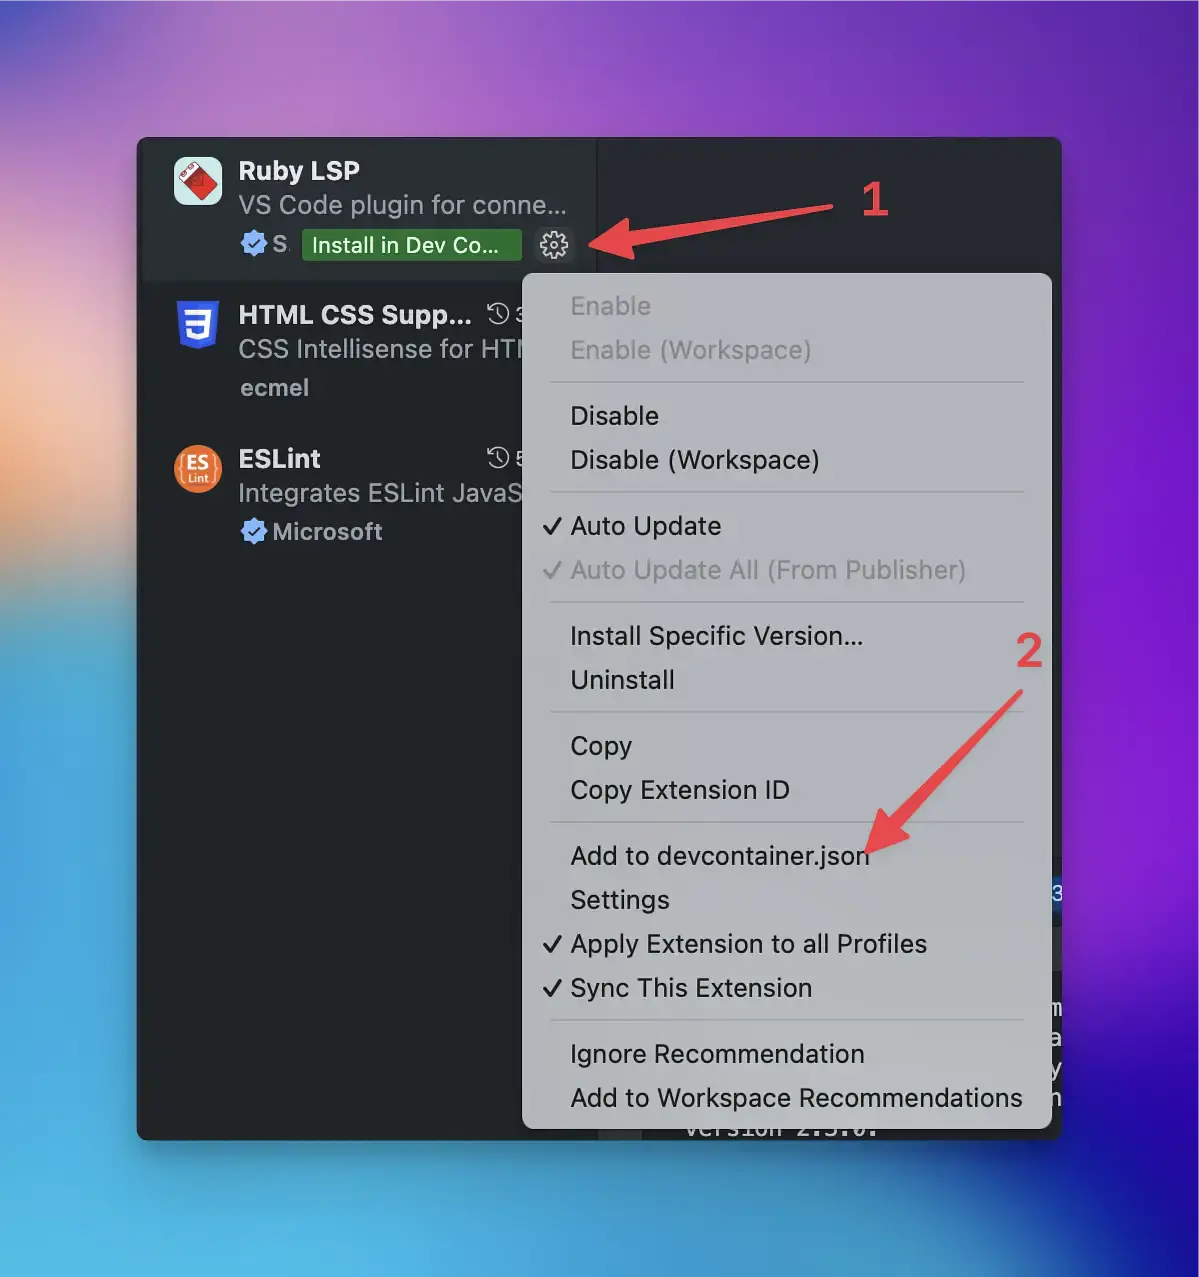
If you give .devcontainer/devcontainer.json a look, you'll see a new "customizations" section:
"customizations": {
  "vscode": {
    "extensions": [
      "Shopify.ruby-lsp",
    ]
  }
}
This new "extensions" section will make sure whatever is listed here will be installed in the VS Code instance inside the dev container. We'll repeat this process for the other extensions we install as well.
3.3 Rebuild the container
Anytime we modify the devcontainer.json, rebuilding the container is a good idea. VS Code will usually pop up a dialogue to remind you:
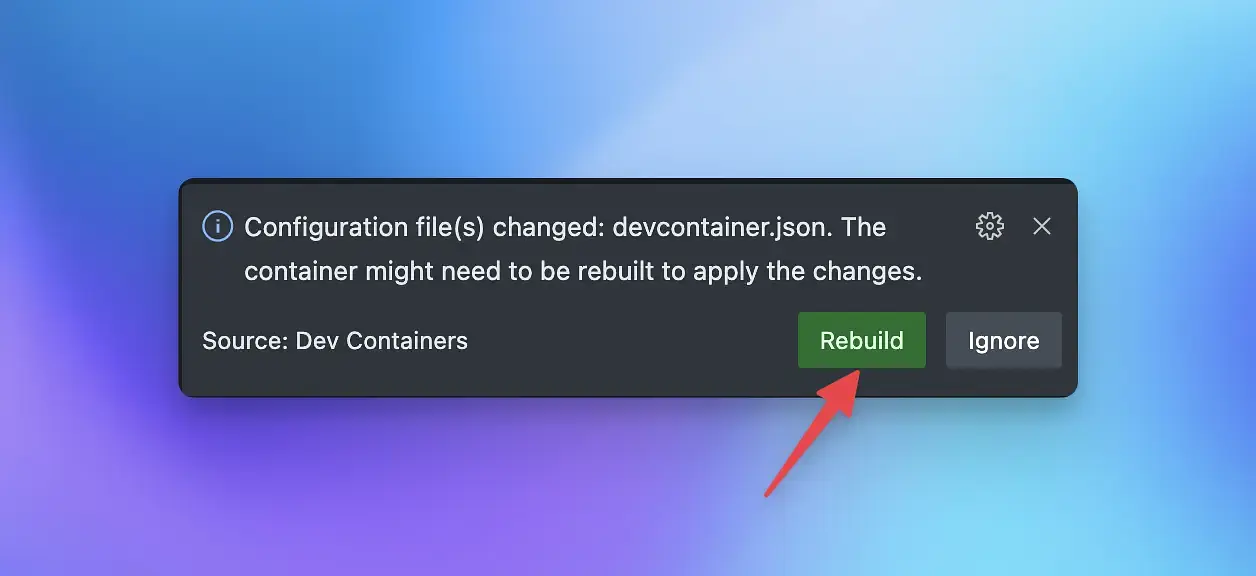
If you miss the prompt, you can cmd+shift+p and choose Dev Containers: Rebuild Container. Do this now.
3.4 Verify the Ruby LSP extension is working
Open up app/models/application_record.rb. Do you have syntax highlighting? Can you cmd+click on primary_abstract_class and jump to its definition? If you answered "yes," then you're off and running with the Ruby LSP extension, which provides an impressive number of tools to aid you in your Ruby journeys. Most of the extension's features should work without you having to configure anything. The one exception is debugging.
3.5 Set up debugging
Use cmd+shift+p to open the Command Palette and:
- Select Debug: Add Configuration.
- Select Ruby LSP debug client from the dropdown.
This will create a launch.json file with the necessary instructions for debugging.
To be able to attach the debugger, you need to open Procfile.dev and change the web: line to:
web: bundle exec rdbg -O -n -c -- bin/rails server
To attach the debugger, it has to have something to attach to. So, run bin/dev from your terminal to start the Rails server (and other processes). Once the server starts successfully, you can click the Run and Debug icon in the sidebar or press cmd+shift+d to open the debugging section. Click the dropdown next to Run and Debug and select Attach debugger.
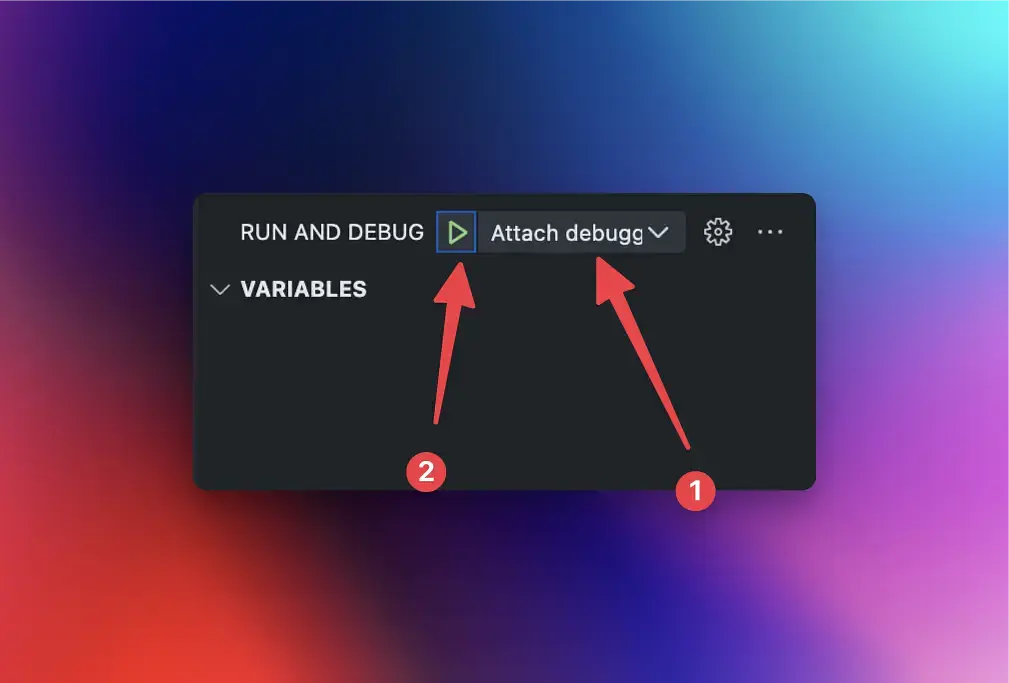
Once you've selected Attach debugger, click the little green arrow to start debugging. If you've been doing debugging via logs or similar, you're in for a treat. You can now drop a breakpoint in the gutter for the line you want to debug. Everything will halt when that line is executed, and you can poke around.
4 Define Standard Ruby as our preferred Ruby linter/formatter
The Ruby LSP extension will use RuboCop to lint and format things out of the box. You can specify other linters if they're more your style.
4.1 Include the gem
If you prefer to use the Standard Ruby gem for its styling, you need to include it in your Gemfile.
group :development do
  gem "standard"
end
Make sure to:
bundle install
4.2 Update devcontainer.json
Now that the gem is installed, you need to update .devcontainer/devcontainer.json:
"customizations": {
    "vscode": {
      "extensions": [
        "Shopify.ruby-lsp"
      ],
      "settings": {
        "rubyLsp.formatter": "standard",
        "rubyLsp.linters": [
          "standard"
        ]
      }
    }
  }
Once that's done, you should be able to hover over the blue squiggly lines in Ruby files and see that Standard is providing the styling.

5 Use StandardJS for JavaScript linting and formatting
We're moving from Standard for Ruby to Standard for JavaScript. Let's go!
5.1 Add the extension to VS Code
Go ahead and add this extension to your project. Don't forget to add the extension to the dev container as we did in 3.1. This ensures anyone using this dev container also gets it.
5.2 Add the JavaScript package
The extension needs the actual JavaScript package to get up and running, so enter the following in your terminal:
yarn add standard --dev
Once that is done, press cmd+shift+p and type/select Developer: Reload Window to have the changes take effect. You now have JavaScript linting up and running. Nice work.
6 CSS autocompletion
Frontend folks know how beneficial it is to have CSS classes and IDs autocomplete while writing HTML. So, let's get that in place. You should be starting to see a pattern by now. Install an extension, ensure it's included in the dev container, and configure it.
6.1 Add the HTML CSS Support extension
You know the drill! Please install the popular HTML CSS Support extension and include it in your dev container.
6.2 Configure the what and where
This extension needs to know where to look for existing CSS to provide autocompletion results. It also needs to know what file types you want its help with. We specify these settings in .vscode/settings.json. This file houses project-level settings that we can include in the repository. Add the following to the file:
{
  "css.styleSheets": [
    "app/assets/**/*.css"
  ],
  "css.enabledLanguages": [
    "html",
    "erb",
    "html.erb",
    "ruby"
  ]
}
The app/assets/**/*.css glob pattern is a pretty flexible solution for grabbing all the CSS files. Feel free to get more specific if you want.
The css.enabledLanguages defines what file types the extension will lend a helping hand in. I have no idea if you need both erb and html.erb, but I had such an inconsistent experience that I now leave them both.
Go take a walk
That was a lot, and I wouldn't blame you if you were exhausted. It was even more exhausting to write. It's probably why I didn't find many other posts describing how to set up a Ruby on Rails development environment in VS Code.
I'm sure you'll want to add your own customizations, but at least you have a solid foundation from which to work. Lastly, it can't be overstated how cool it is that we've defined this all in a way that can get a new contributor up and running on the project in a couple of minutes. That's just plain awesome.
